
E-mail and delete the Outlook object error:
When you delete an e-mail or other items in Outlook, clicking on the button "Del" button, and then will be transferred to the Trash folder. You can simply restore in the Trash folder, you want to find e-mail messages, and returns to its original location or any other normal folder.
However, if you delete the paragraph with "Ctrl - Del", or remove this item from the "basket" folder, then delete the item permanently from Outlook. This is the only way to restore it is to use our product Advanced Outlook Repair can solve this problem, like the wind, namely:
1. Select the Outlook PST file, delete a number of projects is a source to restore files PST.
2. Conclude fixed PST file name if necessary.
3. Repair Outlook PST source. Advanced Outlook Repair will scan and remove deleted items.
4. In the process of repair, you can use Outlook, to open the file PST, and still find all deleted items to restore the objects to delete forever. For example, if you use "Ctrl - Del" to delete an e-mail inbox, then Advanced Outlook Repair will be restored on the Inbox to a folder in the recovery process. If you are using the "Delete" to delete this message from your Inbox, and then removed from the basket, and then restore, will return to a "basket" folder.
Note:
1. If you can not find a place in the draft, they will be deleted permanently, you can try to find their own way, are as follows:
1.1, to find their "Recovered_Groupxxx file. Deleted items can be viewed as objects found that the restoration and creation of a folder named" Recovered_Groupxxx "set in the file PST.
1.2 If you want to know more about the nature of the project, such as electronic mail, provided a number of key words in the body of an email message, and so on, then you can use these attributes as search criteria, Outlook, and use search to find desired point on all fixed assets PST. In some cases, deleted items can be restored, and in any other file or folder name. Use the search function in Outlook, you can find them easily.
You may notice, to eliminate duplication Recovered_Groupxxx file. Please just ignore them. When Microsoft Outlook, to delete a project, it will make copies of implied. Advanced Outlook Repair is so powerful that it can obtain a copy of these implicit and treat them as found objects, which are the restoration and creation of a folder named "Recovered_Groupxxx" set in the file PST.
Showing posts with label Microsoft Outlook. Show all posts
Showing posts with label Microsoft Outlook. Show all posts
Friday, July 17, 2009
Tuesday, July 14, 2009
How to get the Calendar or Task Reminders - Outlook 2000
1 comments
Labels: Computer Help, Computer Repair, Computer Support, dell support, hp printer repair, increase internet speed, Microsoft office, Microsoft Outlook, Microsoft Support
Labels: Computer Help, Computer Repair, Computer Support, dell support, hp printer repair, increase internet speed, Microsoft office, Microsoft Outlook, Microsoft Support
Symptoms: - May your Outlook calendar or task reminders do not appear as scheduled. In addition, in May, you will receive the following message when you click Save and close the new appointment, pay attention to:
Paul said that the investigation in May, not because the issue is not on your calendar or task folder. All this is true?
Reasons: - There are four reasons for this behavior:
* Outlook does not work. Microsoft Schedule +, which is a separate file to handle reminders, the main control program like Outlook. If Outlook is not running, it is not known.
* To remember the calendar or task will not be in your folder. God reminds the lead in the calendar or task folder. The presence of the main folder in your mail. When you create an e - mail, you specify your mail or in personal folders (. PST) in the folder "Incoming e-mail points.
For example, if you get mail in personal folders (. PST) file Inbox and create an appointment in your mailbox, calendar reminder to remind people not happen. If you create the same reminder in your calendar of personal records, it appears that, in a reminder that when the time comes.
* Email service is set to "None" (without the quotes). You must specify the default location for the operational services to cope.
* Note the folder that contains the damaged or corrupted reminder items.
Resolution: - use one of the following methods to solve this problem:
* If Outlook is not running, start Outlook, Outlook is working, and constantly keep in mind is obtained.
* When you create reminders, verify that they are stored in the calendar, or tasks.
* From Outlook, click Start, Run, type Outlook / CleanReminders, and then click OK.
Thursday, July 9, 2009
Where Does Outlook Store All History Data ? ?
1 comments
Labels: Computer Help, Computer Repair, Computer Support, dell support, hp printer repair, increase internet speed, Microsoft office, Microsoft Outlook, Microsoft Support
Labels: Computer Help, Computer Repair, Computer Support, dell support, hp printer repair, increase internet speed, Microsoft office, Microsoft Outlook, Microsoft Support
Will all of your Outlook data (e-mail, contacts, calendar, etc.) in the ominous "Personal Folders" (. Pst) file. They are proprietary and complex, it is a good idea, and then return to their now. First, you need to find the location to make your Outlook. pst files, but.
* Select File Data File Management ... from the menu in Outlook.
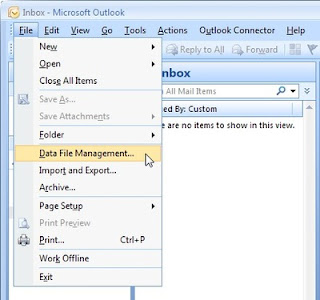
* Highlight your main data file (usually called Personal Folders).
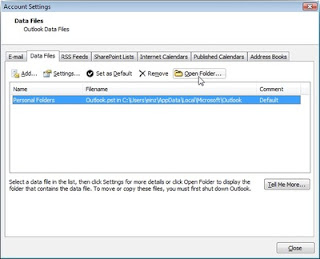
* Click to open the folder ....
To determine the folder and an earlier version of Outlook 2002 to save your data:
* Right-mouse click the Outlook Today, whether in the Outlook bar or folder list.
* Select Properties from the pop-up menu.
* Select Advanced ....
* Please note the path listed under Path:.
* Select the path does not include the file name (usually this will be "outlook.pst") with your mouse.
* Press Ctrl - C to copy the path.
o If, for example, the path listed under Path: is the "C: \ The Documents and Settings \ email.guide \ Application Data \ Microsoft \'s Outlook \ outlook.pst", you can select and copy the "C: \ of the Documents and Settings \ email.guide \ Application Data \ Microsoft \ Outlook in \. "
* Now select Run ... from the Start menu.
* Press Ctrl - V to paste the path
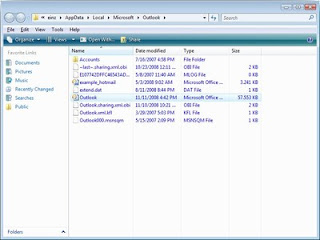
Press the Enter key to open your Outlook data folder in Windows Explorer.
* Select File Data File Management ... from the menu in Outlook.

* Highlight your main data file (usually called Personal Folders).

* Click to open the folder ....

To determine the folder and an earlier version of Outlook 2002 to save your data:
* Right-mouse click the Outlook Today, whether in the Outlook bar or folder list.
* Select Properties from the pop-up menu.
* Select Advanced ....
* Please note the path listed under Path:.
* Select the path does not include the file name (usually this will be "outlook.pst") with your mouse.
* Press Ctrl - C to copy the path.
o If, for example, the path listed under Path: is the "C: \ The Documents and Settings \ email.guide \ Application Data \ Microsoft \'s Outlook \ outlook.pst", you can select and copy the "C: \ of the Documents and Settings \ email.guide \ Application Data \ Microsoft \ Outlook in \. "
* Now select Run ... from the Start menu.
* Press Ctrl - V to paste the path
Press the Enter key to open your Outlook data folder in Windows Explorer.
Monday, July 6, 2009
Dealing with .pst Files
2
comments
Labels: Computer Help, Computer Repair, Computer Support, dell support, hp printer repair, increase internet speed, Microsoft office, Microsoft Outlook, Microsoft Support
Labels: Computer Help, Computer Repair, Computer Support, dell support, hp printer repair, increase internet speed, Microsoft office, Microsoft Outlook, Microsoft Support
For Microsoft Office Outlook 2003 can support a greater personal folders (. Pst) files than earlier versions - up to 33TB. In view of the possibility of archive or export. pst files may be large enough to increase the exclusion of other data the user's hard drive, you may want to look at again. pst file to use in your organization. Outlook 2003, you can use Group Policy to control the size of the old and new. pst file. Even if you are not planning to move to Outlook 2003 any time soon, know how to use Outlook. pst file, and you can disable the use of an earlier version can come in handy.
Use Outlook. pst file you are more likely than the achievement. The most familiar use is an independent user. pst file, not the Exchange mailbox as the default information store. Users can usually create more. pst file to open Outlook's automatic archiving function, which the old items. regular schedule pst file, or through the use of the file, import and export data export orders. pst file. Outlook also automatically creates a. pst file, if the user adds an IMAP4 or Hotmail account to his or her e-mail profile; Outlook use this. pst file to store the local cache of the IMAP or Hotmail e-mail account. Finally, Outlook 2003 to create a new one. pst file, if a user views a Windows SharePoint Services (WSS) events or contacts list, and click the "Link to Outlook" link; this. pst file contains the local copy of SharePoint links list.
Provide some control over it. pst file use, Outlook 98 and later support DisablePST registry values. This DWORD value is in the HKEY_LOCAL_MACHINE \ Software \ Microsoft \ Office \ 11.0 \ Outlook registry subkey in in Outlook 2003; change "11.0" to "10.0" in the Outlook 2002, "9.0" in the Outlook 2000, or "8.0 "The Outlook 98. The DisablePST value does not exist by default, so you need to buy, if you want to disable. pst file. Allowable value is 1 (disabled) and 0 (enabled, default).
DisablePST initial use of an earlier version of Outlook 2002 in, Outlook 2000, the Outlook 98 and in order to prevent users from archiving and export or import. pst file. DisablePST 1 set of these versions of these functions shut down and disable the creation of new. pst file from the file, the new menu. User account configuration in the enterprise / working group model, however, still be able to add new or existing. pst file to their email profile (through the file, Data File Management dialog box or in Outlook 2002 the tools, services dialog box in Outlook 2000 or Outlook 98), therefore some of the Ad Hoc Committee. pst file use is still possible in these versions.
Source :- http://windowsitpro.com/article/articleid/40961/dealing-with-pst-files.html
Wednesday, July 1, 2009
Display a map for an Outlook Contact's U.S. address
0
comments
Labels: Computer Help, Computer Repair, Computer Support, dell support, hp printer repair, increase internet speed, Microsoft office, Microsoft Outlook, Microsoft Support
Labels: Computer Help, Computer Repair, Computer Support, dell support, hp printer repair, increase internet speed, Microsoft office, Microsoft Outlook, Microsoft Support
Just knowing the address of your customers, business contacts, and other places you travel to may not be enough to quickly find the location. If you're not familiar with the area, it can be time consuming to drive around until you figure out the street system. Outlook 2000 takes the guesswork out of traveling. Working with your Web browser, such as Microsoft Internet Explorer, Outlook automatically links an address in your Contacts folder to a map of that area that's available through the Expedia® Maps Web site on the Internet.
Note If an address is in your Personal Address Book, you can import it into Contacts to use the mapping and other features Contacts offers. For more information, type import addresses into contacts in the Office Assistant or on the Answer Wizard tab in the Outlook Help window, and then click Search.
See a map of a contact's address
1.Click Contacts on the Outlook Bar.
2.Click the contact whose address you want to locate.
3.On the File menu, point to Open, and then click Selected Items.
4.Under the address button, click the down arrow, and then click the type of address you want to find on a map - Business, Home, or Other.
5.On the Actions menu, click Display Map of Address.
On the Expedia Maps Web site, you might need to specify additional information to get the most appropriate map for your needs. For help on this, click the Help button on the Expedia Maps Web site toolbar.
If the Web site can't display a map for the address, verify that you entered the address correctly. In the contact in Outlook, click the Address button. Make sure the fields contain the correct information.
Thursday, June 25, 2009
Set personal reminders in Outlook
0
comments
Labels: Computer Help, Computer Repair, Computer Support, dell support, hp printer repair, increase internet speed, Microsoft office, Microsoft Outlook, Microsoft Support
Labels: Computer Help, Computer Repair, Computer Support, dell support, hp printer repair, increase internet speed, Microsoft office, Microsoft Outlook, Microsoft Support
Somebody you ever wanted to set an Looking reminder for something - say, to buy groceries on your way lodging from wreak - but didn't poorness to pretend it an decision because you didn't essential the moment to materialize to others as toiling on your calendar? There are two ways you can do this.
The original way is to create an circumstance. An event is commonly an process that lasts 24 hours or yearner, much as a class feigning or a seminar. Events seem in banners at the top of your calendar.
The merchandise way is to create an decision of adjust instant duration. Appointments ever seem on your own calendar and usually appear as busy clip when others look your calendar. However, since this engagement has no time, it gift not be seen when others see your calendar.
Formerly you find where you essential your reminder to be displayed - at the top of your calendar (an event) or in the calendar (an determination with correct time length) - uprise the steps below to create a individualized reminder.
Set a individualized reminder using an event or an someone with no measure length
1. On the File menu, point to New, and then click Appointment.
2. In the Subject box, type your reminder text.
3. Do one of the following:
To create an event, select the All day event check box.
To create an appointment with zero time duration, select the time you want the appointment to start, and then change the end time to be the same as the start time.
4. Select the Reminder check box, and then enter the amount of time before the appointment when you want the reminder to occur.
5.Click Save and Close.
Thursday, June 18, 2009
How to copy Outlook Calendar items from one folder to another
1 comments
Labels: Computer Help, Computer Repair, Computer Support, dell support, hp printer repair, increase internet speed, Microsoft office, Microsoft Outlook, Microsoft Support
Labels: Computer Help, Computer Repair, Computer Support, dell support, hp printer repair, increase internet speed, Microsoft office, Microsoft Outlook, Microsoft Support
In Microsoft Office Outlook 2007, Outlook 2003, Outlook 2002, and Outlook 2000, you cannot copy all the items in a Calendar folder when you right-click the folder, you click Copy Calendar, and then you paste in another top-level folder. Instead, this method creates a new subfolder under the destination folder.
To copy all of the items from a Calendar folder to another folder, you must select each item and then copy and paste it to the target folder.
To copy all the Calendar items to another folder, you must first display all the items in a tabular view.
To display the items in the folder in a tablular view, use one of the following methods:
* Temporarily clear the filter from an existing tabular view.
* Define a new permanent, tabular view of all calendar items.
Clearing the filter from an existing view
To clear the filter from an existing tabular view, follow these steps:
1. Click to select the Outlook Calendar folder.
2. On the View menu, point to Current View, and then click to select one of the tabular views such as Events or By Category.
3. On the View menu, point to Current View, and then click Customize Current View.
4. In the View Summary dialog box, click Filter, click Clear All, and then click OK twice.
Defining a new tabular view
To define a new permanent, tabular view, follow these steps:
1. Click to select the Calendar folder.
2. On the View menu, point to Current View, click Define Views, and then click New.
3. Type a name for the new view, click to select Table, and then click OK.
4. In View Summary, click Sort.
5. In the Sort items by list, click to select Start and Ascending.
6. In the Then By list, click to select (none), and then click OK.
7. Click OK, and then click Apply View.
Either one of the previous procedures will display a list of all Calendar items.
After all items are displayed, follow these steps:
1. On the Edit menu, click Select All.
2. On the Edit menu, click Copy.
3. Click to select the destination folder.
4. On the Edit menu, click Paste.
This process inserts a copy of all the Calendar items into the destination folder.
Tuesday, June 2, 2009
How to make a backup copy of a personal folders (.pst) file
0
comments
Labels: Computer Help, Computer Repair, Computer Support, dell support, hp printer repair, increase internet speed, Microsoft office, Microsoft Outlook, Microsoft Support
Labels: Computer Help, Computer Repair, Computer Support, dell support, hp printer repair, increase internet speed, Microsoft office, Microsoft Outlook, Microsoft Support
This article describes how to automatically back up your personal folders (.pst) file in Microsoft Outlook 2002 and Microsoft Office Outlook 2003. If you are not using Outlook together with Microsoft Exchange Server, Outlook stores all its data in a .pst file. If you want to back up or export a particular folder, such as the Contacts folder or the Calendar folder, follow the steps :-
To back up the whole .pst file, follow these steps:
1. Close any mail-related programs such as Outlook, Exchange, or Microsoft Windows Messaging.
2. Click Start, point to Settings, and then click Control Panel.
3. Double-click Mail and Fax or Mail.
4. Click the Personal Folders service you want to back up. By default, this service is called Personal Folders. However, services may be renamed. If a service is renamed, you can determine the type of the service. To do this, click the service in the list of services, and then click Properties. In the dialog box that appears, the title bar displays Personal Folders if the service is a Personal Folders service. After you read the title bar of the dialog box, click Cancel. Use this method to determine the type of any service with which you are unfamiliar.
5. Click Properties, and then make a note of the path and the file name that is listed.
Note :- You can possibly reduce the size of a .pst file when you click Compact Now. This is especially useful if you plan to back up the .pst file to a floppy disk.
6. Click OK two times to close the Properties dialog box.
7. Make a copy of the file that you noted in step 5 by using Windows Explorer or My Computer.
If you ever have to restore a .pst file from removable media such as a floppy disk or a CD, copy the backup copy of the file that you created by using the previous steps. Restore the backup copy of the .pst file, to the same hard disk, path, and file name that you noted in step 5.
How to export .pst file data
To export an individual folder, such as the Contacts folder or the Calendar folder, follow these steps:
1. On the File menu, click Import And Export.
2. Click Export To File, and then click Next.
3. Click Personal Folder file (.pst), and then click Next.
4. Click the folder that you want to export, and then click Next.
5. In Save exported file as, type the name of the file to which the data is exported.
6. Click Finish.
How to import .pst file data
To import a .pst file into Outlook, follow these steps:
1. On the File menu, click Import And Export.
2. Click Import from another program or file, and then click Next.
3. Click Personal folder file (.pst), and then click Next.
4. Type the path and the name of the .pst file that you want to import, and then click Next.
5. Click the folder into which the data is imported.
6.Click Finish.
Subscribe to:
Posts (Atom)